Pages

Wednesday, July 26, 2017

Not sure if this domain name redirect works but here goes

Bear with me while I change some stuff around.


I just dumped my big, clunky, expensive website so I can concentrate my online sales on Etsy and a few Facebook fabric sale sites (didn't know Facebook fabric sales was a thing)

I'm trying to follow the directions for my domain name host, and I think I did things correctly?  I also know it takes a day or two before stuff transfers.

In the meantime, I'm mostly just going to use my Facebook Quilt Lodge page to share info while I figure out how to work this blogspot site.  Bonnie Hunter uses this method, and while she is definitely a good  blogger, I can learn?  I hope?

I'm also heading out for my annual huckleberry picking adventure, so my friend and major support person Betty will be holding down the fort on Fridays 10am till 3pm and Saturday's 11am till 2pm.  Be sure and stop by and give her a hard time, ask her a really hard question (then run).

This picture above is of the Old Roosevelt School Building that's right on Broadway.  Our building has sold to a non-profit that hopes to renovate and create a space for the Arts and Culture.  The boiler guy was in the old boiler room getting things ready for a very important test.  If all goes well (saying prayers here), the boiler will be started and I will be moving to a lovely classroom, maybe this fall.

Stay tuned

The Calamity Quilter


Saturday, July 15, 2017

Sunday, July 2, 2017

My favorite sew and flip method for corners

This method has really improved my outcomes for adding a corner to a square or rectangle.  The method I used the most previously was to draw a pencil line from opposite corners, sew on the line, trim and then flip and press.  My outcomes were hit and miss, maybe I could even say disappointing, and apparently I'm not the only one who suffers from this quilt piecing dilemma.

I used this trim first and sew second method for the first time on a Cozy Quilt Design pattern and I really thought I was doing more steps instead of less, WRONG!  To make these corners, the old way, or the new way, I'm still doing the same number of steps, just rearranging the order.

Use this picture demo to help you with your next project that involves flip and turn corners.

Step 1
Put a square on top of your rectangle or larger square, right sides together


Step 2

Take a ruler and line up the opposite corners with the 1/4 measurement so you can trim off the excess fabric from the corner you want to flip towards (thank goodness for pictures)

I'm using the Creative Grids Quick Trim and Curve Ruler which also has a lovely 45 degree angle I can use to line up the blue rectangle, this turns out to be very helpful


Step 3

Sorry this picture is a little blurry, I didn't notice that until I finished my little demo.
Trim off the extra fabric from your corner, just like this.


Step 4

Sew from corner to corner, use the fabric cut edge as your seam allowance guide.
Notice I'm not using a line?  Just do it, don't think too hard about it.
An accurate 1/4 inch seam allowance is really helpful, for everything.


Step 5

Flip this corner and press seams towards the new color of corner.
Whoo hoo!
I'm not a point princess, but I do like to improve my odds for accuracy.
I hope this helps you with your quilt piecing accuracy (and happiness) as well!


I did lots and lots of these little flip corners in this quilt.
Each strip is 1 inch wide, finished.


Thursday, June 8, 2017

New Cutting mat and new rotary cutter blade, ahhhh

Why do I wait so long to change my blades, and why didn't I remember how cutting on a new mat is like slicing through butter?


Piecing a quilt just got better
with a new blade in my Gingher Rotary Cutter


I'm always surfing Facebook and there's often good information about things to make your quilting experience better.  I stumbled upon an article about how using a crappy blade on a well used cutting mat can effect your cutting accuracy.  Hmm, I know my cutting mat is well used, especially the quarter yard lines that I used cutting fat quarters and fat eighths at the quilt studio.  I take these well loved mats home and use them, maybe I shouldn't!

I have brand new cutting mats and blades, so I did what I should have done and brought a brand new blade and a brand new mat home with me.

Ahhhh, feels so good!  Cuts so cleanly!  And when I trim my quilt block pieces, it's much easier to just brush away the little scraps when you have a lovely smooth surface.

Think about it, are you ready for an update?  Treat yourself to a new blade and mat.  I've spoiled myself and started using the Gingher Rotary Cuter, I love the way they feel in my hand.  I use these cutters for my personal piecing and use a Olfa for cutting fabric for customers in my Quilt Studio.


Friday, April 28, 2017

Why do I leave things till the last minute, so here's a free pattern

I just watched a TED talk by Tim Urban "Inside The Mind"  and I'm comforted to know that Procrastination is a quality all of us have in common, at least to some degree.

A big question for a quilter concerns deadlines, do we really have deadlines?  We sure do.  How about when we're trying to get a baby quilt done. I consider it great if the quilt makes it to the baby before the baby is 2 (not 2 months, 2 years).

At least this one is quilted and bound


I have a couple ideas about those baby quilts:


  • Start the instant you find out there's a baby coming
  • Make that quilt bigger, think "youth" size
  • Whatever you do, don't tell the parent the quilt is coming, just deliver when it's complete
  • Make several quilts ahead of time and keep them for these exact occasions (this makes too much sense for the procrastinator, not sure I can do this)

My biggest problem right now is finishing patterns, I just struggle getting my ideas from the design I just made to a pattern someone else can follow.

I keep trying, but in the meantime I've taken a couple of pictures of an easy charm pack quilt I just finished:

Start with a few 2 1/2" squares
4 Strips 2 1/2"
Sub-cut into 56 2 1/2" squares

From about a yard of grey fabric cut 13 strips 2 1/2"
Sub-cut into (97) 5" rectangles

Stitch a grey rectangle to each of the charm pack squares
Stitch a pink 2 1/2" square to 42 grey rectangles
Stitch this unit to each of the charm square units
Organize your charm units on your design wall
I did 7 blocks by 6 blocks

Make more rectangle/square units for the sides that are in need of the grey/pink border
Sew this all together, quilt and bind


Now, find a few charm packs a little sashing and contrast squares and make a few of these up ahead of time and whip one of these cuties out for a gift, completely stress free!

Enjoy,
The Calamity Quilter

Saturday, November 19, 2016

60 Day Club, An Adventure of Finishing UFO's

Unfinished projects are the subject of many jokes in a quilter's world.  Here's a small sample of some of the comments I receive in the quilt shop:

  • Do I have any UFO's?  Are you kidding?  I built a storage shed to hide my stash!
  • I might be able to find 5, 😉😉😉😉😉
  • How many years will we be doing this program, I may need 10 or more
  • I'm saving fabric for retirement, I want to make sure I have enough when I'm on a fixed income
There has been 2 people who let me know that they really don't have any unfinished projects, they pretty much finish things they start.  I didn't have my camera running to show you my jaw hitting the floor when I heard this, I love these people, but we really don't have much in common.

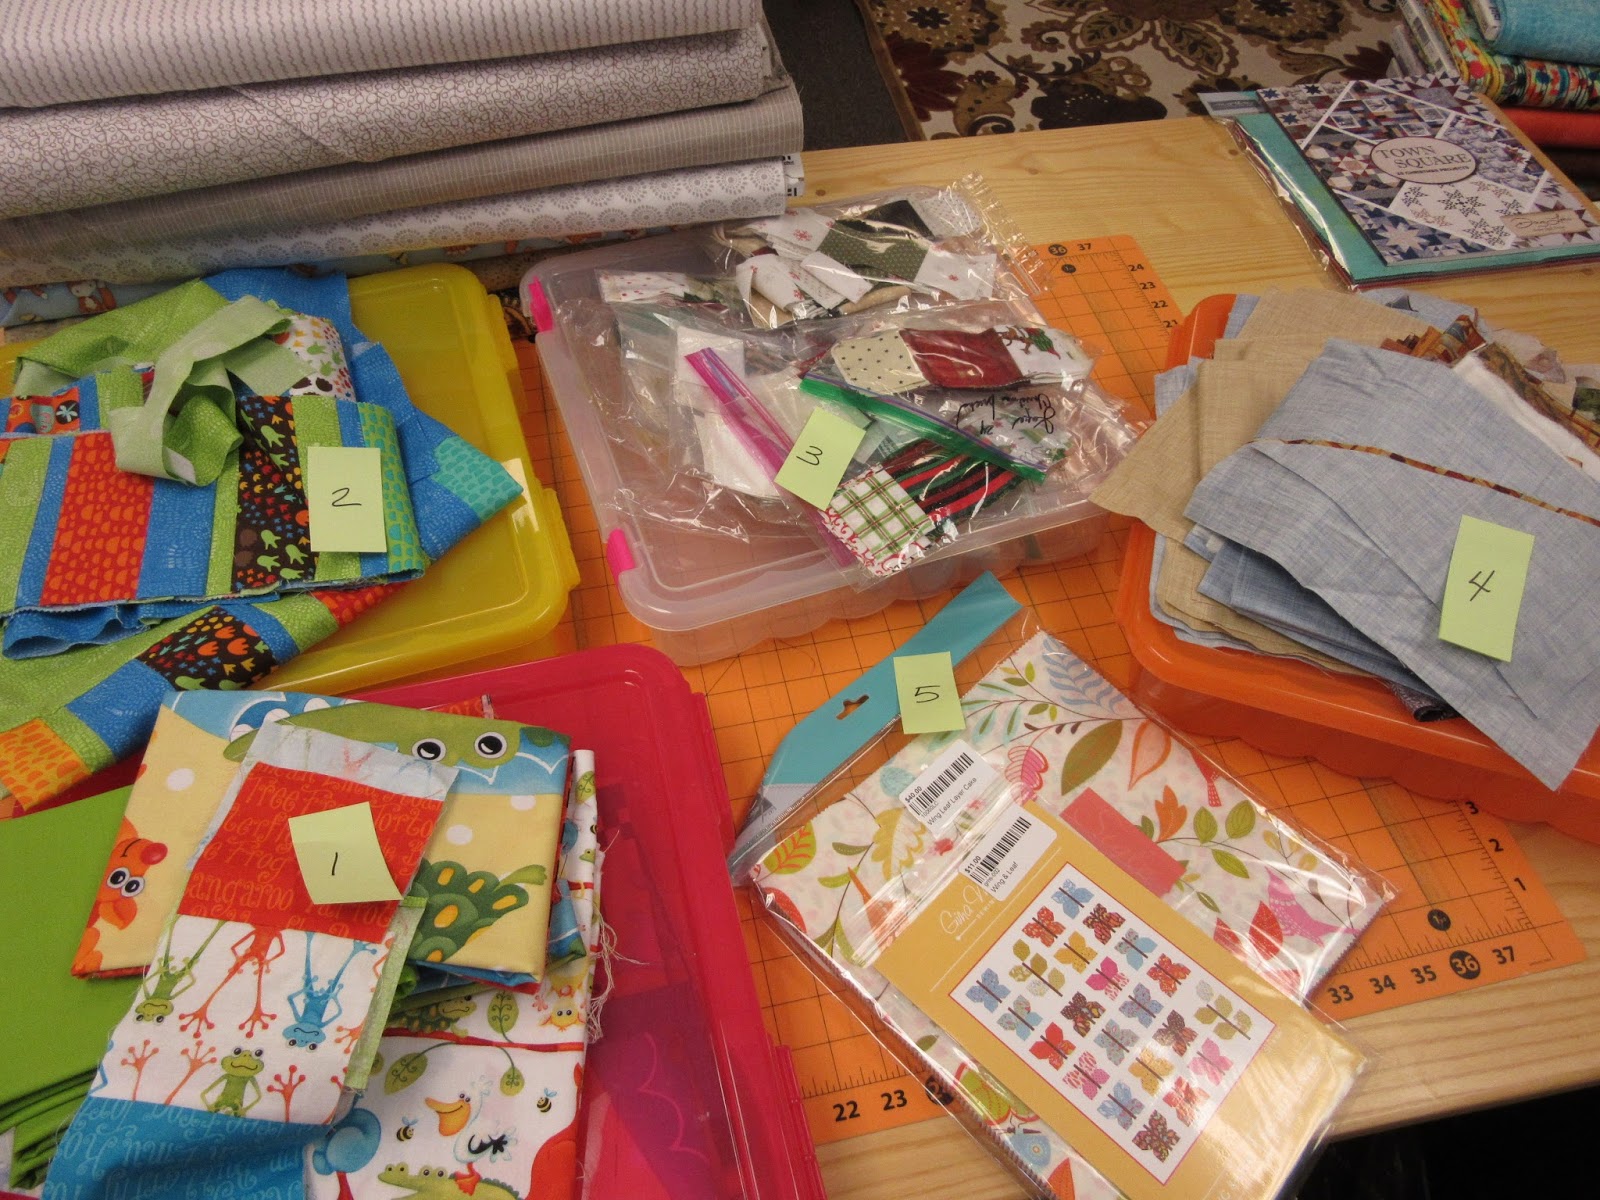
What the heck is the 60 day club?  Find 5 unfinished projects and gather them for a group photo by the first week in January.  Take five post it notes and number them from 1 - 5 and place a number on each of the 5 projects, take a picture (evidence).


Just a sample, my projects have yet to be identified


        • Pick 5 Unfinished projects you want to complete in 2017

When I say unfinished projects, pull out those ones you've been saving, because you can't stand the idea of losing them forever, and you think if you got them done, you'd be happy and proud
How unfinished?  Oh heck, let's not get caught up in minutiae (not sure of the spelling).  Some of my projects have been in my shoeboxes for 10 years and some I just haven't even cut out yet, some are big and some are small.  Bigger is not better, DONE IN 60 DAYS is better
Now for the Evidence.  Arrange your projects into stacks, 5 stacks.  
Number 5 post its 1 - 5 and place them on each of your 5 projects to be completed next year
Take a picture for evidence, this will be shared with your group.
Don't have a group?  Make one, or join ours or just post on the Quilt Lodge Facebook page.
The first week in January we are getting together for a sandwich and beer party, probably at Sam's taproom, and the first number will be drawn, this is the first project everyone will start on and finish in 60 days
Next comes a show and tell pizza and beer party, at the end of the first 60 days, we'll get together and show off our UFO's that are finished (at least the top, unless it's a table runner, you'll get all kinds of crap if you only bring the top of a table runner)
If you don't finish your 60 day project, fine, bring it anyways, show some progress, and don't forget to bring a dessert to share, with everyone!  Some people wanted the unsuccessful to buy dinner, but I was afraid people would come up with an excuse and run for the hills, we don't want that
We'll pick the next number at the show and tell and let the fun begin, again, and in 60 days we'll get together and have a meal, repeat!
Yes, I'm long winded
Let me know if you want to join, I can help you connect with others in your local area for your group parties, but hope you make it to one of our's in Red Lodge
<a href="https://www.bloglovin.com/blog/12420367/?claim=v5x2xr48n82">Follow my blog with Bloglovin</a>


Thursday, September 17, 2015


Some days are just made for having coffee in the afternoon.  Yesterday was one of those days in Red Lodge Montana.  I'm always looking up the rain/moisture doppler radar from Weather Underground to see if we're gonna have some rain.  Yesterday morning the doppler map was completely green up in Yellowstone National Park, and the way the jet stream was moving, I was sure we'd rain all day.

Just a few drops here in town, dang it.  On the bright side; where I saw the big green blob on the doppler radar, it did rain.  Thank goodness, because there was a big fire that started up there last weekend.  It's burning not too far from one of my favorite peaceful spots in the Park, the Nez Perce  Ford picnic area.                                
This morning Beartooth Pass was closed 12 miles south of Red Lodge because there was a bit of a snow event on the Wyoming side of the Pass.  Hoping it's open this weekend, because I know many travelers will enjoy the view.

Making taco soup tonight for dinner, it's a fall favorite.


Tuesday, March 18, 2014

Playing Catch-Up For Monthly Block Exchange

I'm so far behind!  All of a sudden I look over to the side of my sewing machine and I find a stack of block exchange blocks that I need to get done.  On top of that, I present my own block at guild in April!  I'm pretty sure I can get these done, maybe even before summer hits.

Here is one for Crystal Dreese.  Crystal, this was a challenge!  Good for you and I hope you like!


Next is one for Teresa Bartholomew, very traditional, like me!


Now all I have to do is get over to my stack and get to sewing!
Any day quilting is a good day.

Thursday, February 27, 2014

My Own Quilt Challenge

I have been playing around with this panel and batik combo since last October, or maybe it was November.  What I need to do is finish this darn thing.  I'm getting kinda attached to it hanging on the wall.  I like the colors, I like looking at it, especially when I've had snow all around me since the first week in October.
I wanted this quilt to be a bit disorganized (like the developer) so I'm doing weird things like trying to not have the panel in the center.  I need this to be wide enough to fit a double bed because I may want to look at this every winter for a bit, just to remind me that spring is coming, some day.

I've had a bit of fun with friends and visitors putting their own ideas in the block arrangement.  Once I sew these blocks together, I think I better stick to it.

Then, write a pattern, ugh!  I promised to write a pattern, so wish me luck!

The Calamity Quilter

Monday, September 9, 2013

Jellystone Park Quilt

Sometimes I just laugh at myself for being so clever!  This Jellystone Park Quilt Kit features the Glamping fabric line by Moda.  I just couldn't help it, the pattern is called Jellystone Park by Legacy Patterns, then I stumble upon the Glamping fabric by Moda, and pow, it's a kit!

The size I chose takes one jelly roll and a couple of border fabrics.  In the kit I have included the pattern, the jelly roll, both borders and binding fabric for a total of $78.

There is just one block, but the way the blocks are organized together has a method.  Try not to be like the calamity quilter and think you know what you're doing, only to find out I did a row backwards, therefore requiring the use of my seam ripper.

You may be wondering what I think is so funny about picking this fabric and pattern together?  Well, my shop, Quilt Lodge is just North of Yellowstone Park.  We get tons of tourist people (many are quilters) who drive over the Beartooth Pass on their way to Yellowstone Park. 


The next thing you should know is I have a hankerin' to fix up a vintage trailer (I need one with a bathroom) and join up with the Sisters On The Fly group.  So having vintage trailers, women with red lipstick and gingham checks all in the same quilt is just right for me.  The Sister's On The Fly group has quite a few "sisters" who are quilters. 


 So much to do in this one lifetime, hope I can get it all done!  If you follow this link, you can find this kit, and others on my online Quilt Lodge shop.

Jellystone Park Kit $78

Happy Quilting from
The Calamity Quilter
Somewhere close to a seam ripper in Red Lodge, Montana

Tuesday, August 27, 2013

9 Patch Slice and Dice Part 2

Have some fun slicing up your 9 patch blocks, put them up on your design wall and just see what happens!  Because everything I do is not perfect (therefore a "calamity"), I try my darnedest to turn a boo boo into something that works.  Just throw out directions, they're only a suggestion anyways!


 In this quilt block I used some batik charm square and pared them up with a warm bright cotton star print fabric.  The effect is like a ray of sunshine in the morning, maybe a bit like the beach, but a gal in Montana can dream can't she?


Once you get your 9 patch block put together, fold your block in half and press a little fold into each side of the block to help you make a perfect slice in half.  I tried to use my ruler, but I just fussed too much due to imperfect seams lines and decided to just cut the things in half the best way I could.  Whatever works for you! 

Hope you get the picture :)


Next, take your prizes over to your ironing board and make another fold crease in the center.  You'll end up with 4 equal blocks, each with one large square, one small square and 2 rectangles.  But before I let you go, I tried goofing around with my half cut blocks on the design wall............


It never fails, I always like what I see, just imagine the possibilities! 

Ok, you may notice that the design wall in the background of these pics looks very happy and has the faint shadow of some bold flowers.  I get vinyl tablecloths on sale, especially at the end of a season, and pin them up on the wall backwards so the flannel side is ready for my blocks to stick, works great.


Now just in case you were thinking I can count, I must share that I had an accident and mixed up my 9 patch squares.  It turned out that I made some with the background color in the center and at the corners, rather than the batiks.  Not to worry.  I decided this could be another cool design, so I finished making 25% of the blocks with the background in the middle, and the rest of the blocks had the batik in the middle.

Once I put the blocks up on the wall, I decided on the design you see in the last picture.  You can mix your blocks up anyway you want, in fact, I've seen these blocks turn out looking completely different than what you see here.  I added a border and wa la (not sure that's a word).


Signing off for now,

The Calamity Quilter,
Somewhere close to a seam ripper in Red Lodge, Montana


Thursday, August 22, 2013

Rodeo Quilt for the Hoedown in Red Lodge


A couple of days ago the Carbon County Historical Society and Museum in Red Lodge, Montana dropped by the Quilt Lodge. They told me about their annual fundraiser whose theme this year is “The Hoedown – Outlaw Style” that will take place in September. They politely asked was there anything I’d like to donate from the Quilt Lodge to their auction to help raise funds for the museum in town?


Serendipitously, I had the perfect quilt for the hoedown, my “Home of Champions Rodeo” quilt. Holy cow!! :)  This past spring the spirit of the Wild West and rodeos took hold within me. Fabrics with horse riding cowboys, cowboy boots, cowboy hats and stars fired my quilting passion.


Home of Champions Rodeo Quilt


The border on the quilt is bucking broncos and cowboys. I thought “Home of Champions Rodeo” was a great name as Red Lodge hosts the annual Home of Champions Rodeo every 4th of July holiday.  The reverse is a cowhide-like pattern which is minki to the touch. 
Reverse minki side of quilt


The rich and diverse history of Red Lodge, Montana is on display at the Carbon County Historical Society and Museum in the beautiful historic brick building located on the main street, Broadway Avenue. To preserve all of the local history a fundraiser takes place annually and this year’s theme is “The Hoedown--Outlaw Style”.

Saturday, September 21 at Rock Creek Resort is the date for all the fun. Although not mandatory, attendees can dress according to the theme and perhaps channel one of the many colorful historical characters known to have frequented Red Lodge such as Calamity Jane or the first elected marshal John “Liver-Eating” Johnston.

Festivities start at 5:30 PM with a cocktail hour followed by dinner. Entertainment will be provided including dancing. Both a silent and live auction will feature great items including several trips for two, along with my “Home of Champions Rodeo” quilt, of course. :)  Tickets are $50 a person and $750 for a table. It’s going to be a heck of a good time. Look forward to seeing you there!! :)
Close up of minki side